All Categories
Featured
Table of Contents
- – Remodeling Rv Eastvale, CA
- – OCRV Center
- – Rv Restoration Companies Eastvale, CA
- – Awnings For Rv Eastvale, CA
- – Rv Chairs Eastvale, CA
- – Rv Floor Replacement Eastvale, CA
- – Rv Couch Bed Eastvale, CA
- – Rv Chairs Eastvale, CA
- – Replacement Windows For Rv Eastvale, CA
- – Rv Sofa Beds Eastvale, CA
- – Replacement Windows For Rv Eastvale, CA
- – Rv Microwave Replacement Eastvale, CA
- – OCRV Center
Remodeling Rv Eastvale, CA
Much like the windows in your vehicle or home, there are a couple of various types. Perhaps you want a home window in your door so that you can allow in the sunlight?
And if you want your home windows to be tinted, we can aid you there. I'm sure you're aware of all that a home window can do.
Without the windows to allow in the light to tell you whether it's night or day, you could obtain all kinds of blended, maybe also miss out on a huge occasion. Or imagine you're having a cookout with your family and you run inside to obtain some even more hot canines. Without a window, you wouldn't have the ability to see that your daughter is getting extremely near the fire and nobody else has noticed yet.
Rv Restoration Companies Eastvale, CA

The sun is a terrific designing device to utilize, brightening area and visually increasing it. All the most effective decorators recognize just how much of an effect lights can have. Whether you're using it to accentuate an impressive item of art work or add warmth to an entire room, lighting makes all the difference in a room.
If you have older windows that require replacing, the procedure for installing the brand-new windows isn't as easy as it looks. You require to get rid of the inner structure of the old window by getting rid of the screws. You require to eliminate the external frame of the window by pressing it out of the window location.
Next off, get rid of any one of the old sealers from the location with a putty knife. Once that is done, tidy the area with a suitable cleaner. When your location is tidy and devoid of particles, inspect the architectural elements of the window opening. If there is anything that requires repaired (rusted staples, as an example), see to it you fix them prior to installing the new window.
Again, ensure you are utilizing the aid of another person to maintain whatever straight and even and avoid the home window from dropping. Once the external frame and the glass structure are in location, protect them by placing and safeguarding the internal framework on the within the home window location.
Awnings For Rv Eastvale, CA
We think in supplying the greatest worth, high quality, and option (Rv Refrigerator Replacement Eastvale). Plus, we desire you to enjoy your purchase! In case you desire to send out an item back to us, you might return most unused things for a reimbursement or exchange, minus delivery, within 90 days from the day of purchase unless noted listed below under exemptions and exemptions
A return consent will certainly be provided, and, in every instance, we'll start to maintain an eye out for your return. For internet orders returned in-store, please take the item in original packaging, along with the billing to any kind of Outdoor camping World retail places for a refund or exchange.
Rv Chairs Eastvale, CA
Refunds for web orders released in-store are able to be refunded to a GIFT CARD or MAILED CHECK ONLY; some exemptions might use. For retail purchases returned with an invoice, please return the extra and unopened item, with the original sales invoice, for a full refund or exchange. All returns with a present invoice will certainly get a store debt for the amount of the thing at the time of purchase.
When it comes to Motor home traveling, having the best windows can make all the distinction. Whether you're looking for far better insulation, improved air flow, or simply a better sight, there are a couple of essential elements to take into consideration when selecting the best Motor home window for your automobile. Below are 5 tips to aid you make a notified choice and enjoy your trips to the max.
Rv Floor Replacement Eastvale, CA
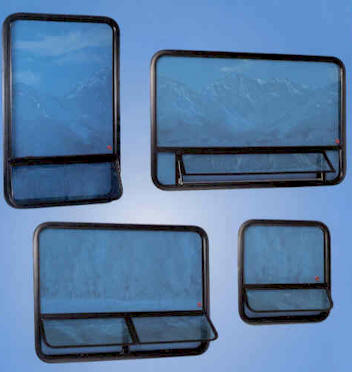
Set windows are fixed and can not be opened up, while sliding home windows can be opened up horizontally or vertically. Awning home windows are pivoted at the leading and open outward, offering excellent air flow. Think about the sort of window that will ideal fit your requirements and choices prior to purchasing. When picking a RV home window, it is very important to look for premium materials and building and construction.
Try to find windows that are made from solidified glass, which is more powerful and a lot more resistant to breakage than normal glass. Furthermore, the frame ought to be made from tough materials like light weight aluminum or plastic, and should be developed to avoid leaks and drafts. Investing in a high-quality RV window will ensure that it lasts for many years and supplies reputable efficiency on your travels.
The home window ought to fit well right into the space offered, with no spaces or spaces that might enable drafts or leakages. Action the opening meticulously and select a home window that matches the dimensions. Furthermore, consider the form of the window and just how it will fit with the general layout of your motor home.
Rv Couch Bed Eastvale, CA
Your motor home's home windows are the secret to enjoyable outdoor camping, allowing you see all the views of the road and your locations. If you're driving a motorhome, the windshield is one of the most important home window on the entire motor home. Regardless of which sort of RV you possess, your home windows are a fundamental part of camping.
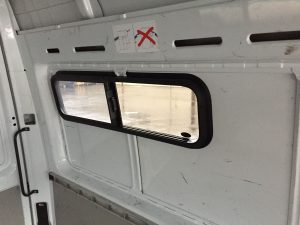
Older Motor homes were constructed with much less innovative home window systems, so there is wear and tear that may be apparent., but specific problems like haze, scratches, or concerns with the covering of the window may mean it's time to change your RV home windows.
There are splits, deep scratches, or chips in the home windows. The home windows are no longer firmly secured. Wind or water goes into the rig from around the home windows, even when the windows are shut. Your home windows aren't effectively insulated. Your windows rattle when the motor home is in activity. Wondering if it's time for a RV window substitute? Get in touch with your neighborhood Lazydays recreational vehicle dealer to learn more about our home window replacement and RV glass repair services! When replacing your RV windows, you have the ability to choose the right window for your motor home and your needs.
Rv Chairs Eastvale, CA
There are likewise alternatives such as clear glass, pebbled windows, and colored recreational vehicle windows. Your design, safety and security, and home window make use of demands will certainly help identify which kind of RV home window you pick. Your motor home's home window structures integrate the inside and exterior components of your RV, and they ought to be properly set up to make sure that the sidewall's seal remains leak-proof.
The very best method to ensure that your motor home home window substitutes are mounted correctly is to leave it to the professionals. Our RV solution experts can replace any type of windows and glass on your RV, consisting of the windscreen, side home windows, and even the much more intricate recreational vehicle door home window substitute. Door home windows, otherwise mounted effectively, can rattle when you're utilizing the motor home door, so leave that repair to our specialists at Lazydays RV.
Replacement Windows For Rv Eastvale, CA
These home windows open outside with a crank mechanism, permitting for air flow while minimizing rain entry. Commonly larger windows that do not open, giving unblocked views and light if outfitted.
Supplies a watertight seal around the window. While RV windows differ from property home windows, they require routine attention and upkeep to prevent problems like water leaks.
Rv Sofa Beds Eastvale, CA
Ensure to look for room-by-room display elimination as needed. To make certain the long life and performance of your recreational vehicle windows, take into consideration the complying with tips: Analyze the location where the home window satisfies the wall for any type of voids or spaces. Clean the area extensively prior to using silicone sealant. In severe instances, you may need to get rid of the window and re-install it using putty or foam seal.
We urge customers to verify the materials and seek advice from their supplier or Keystone motor home for the most existing details. If you have any kind of concerns or require additional clarification, please do not wait to contact your dealer or connect to Keystone recreational vehicle straight.
For those of you that are extra aesthetic, you'll value our step-by-step tutorial video, embedded below. If you like the written word, the steps are laid even more down the page. Or delight in both! These are the tools we needed for our camper home window substitute. Relying on your recreational vehicle, you might or may not require every one of these tools for your task.
No issue where you get your brand-new recreational vehicle home window, you'll need to offer exact dimensions. Let's damage down our process for determining a motor home home window for replacement. Begin by eliminating any home window frame, blinds, or tones. Next off, eliminate all screws around the border of the home window, and remove the inside framework.
Replacement Windows For Rv Eastvale, CA
Don't place any outside stress on the window while taking your measurements, or it could come loosened and fall. For additional safety and security, you may intend to have a helper on a ladder outside, holding the home window in area while you measure. Very carefully eliminate the structure of your old window so that you can determine the opening (NOT the home window itself).
For our rectangular home window, we required to take only four measurements. Be conscious that we're gauging the opening itself. Utilizing a determining tape, take cautious note of the size and elevation of the opening. It's a great idea to take measurements at several points so you have an idea of exactly how cleanly the window opening was cut.
Rv Microwave Replacement Eastvale, CA
Next off, measure the density of the wall (deepness of the window), from the exterior wall surface to the interior wall surface. For this dimension, utilize your ruler (with dimensions that run right to the end). Put the ruler right into the wall till it touches the beyond the home window framework.
Dimensions of the old home window and the window opening are typically various. Window suppliers use filler strips to maintain the window degree and snug.
Action twice, cut as soon as, right? Take your time to get an accurate dimension, and double-check it by measuring a 2nd time. Precise dimensions are essential to RV window substitute. You don't intend to loosely measure and round up or down. Constantly measure to the nearest 1/16th of an inch. Take a close check out your tape measure and make certain you understand which are the 1/16th-inch dimensions.
OCRV Center
Address: 23281 La Palma Ave Yorba Linda, CA 92887Phone: (714) 909-1444
Email: [email protected]
OCRV Center
The window manufacturers are the very best authorities on mounting their products. The maker of your brand-new motor home home window has most likely consisted of practical standards or ideas to make the setup less complicated. These kinds of directions are typically consisted of on makers' internet sites too. If your brand-new window included instructions in the plan, make certain to maintain those useful, as they may have outlined step-by-step directions in a consisted of brochure.
Rv Sofas Eastvale, CARv Sofa Sleeper Eastvale, CA
Rv Restoration Companies Eastvale, CA
Rv Carpet Replacement Eastvale, CA
Rv Floor Replacement Eastvale, CA
Rv Floor Replacement Eastvale, CA
Rv Dinette Booth Eastvale, CA
Awnings For Rv Eastvale, CA
Rv Restoration Companies Eastvale, CA
Remodeling Rv Eastvale, CA
Rv Interior Furniture Eastvale, CA
Rv Replacement Furniture Eastvale, CA
Replace Rv Flooring Eastvale, CA
Replacement Windows For Campers Eastvale, CA
Awnings For Rv Eastvale, CA
Rv Microwave Replacement Eastvale, CA
Rv Couch Bed Eastvale, CA
Rv Carpet Installation Eastvale, CA
Awnings For Rv Eastvale, CA
Rv Couch Eastvale, CA
Rv Couch Bed Eastvale, CA
Rv Replacement Furniture Eastvale, CA
Remodeling Rv Eastvale, CA
Rv Replacement Furniture Eastvale, CA
Rv Couch Eastvale, CA
Rv Couch Eastvale, CA
Rv Sofa Sleeper Eastvale, CA
Rv Couch Eastvale, CA
Rv Sofas Eastvale, CA
Rv Chairs Eastvale, CA
Awnings For Rv Eastvale, CA
Rv Sofas Eastvale, CA
Rv Floor Replacement Eastvale, CA
Rv Dinette Booth Eastvale, CA
Rv Dinette Booth Eastvale, CA
Rv Restoration Companies Eastvale, CA
Rv Microwave Replacement Eastvale, CA
Rv Replacement Furniture Eastvale, CA
Rv Restoration Companies Eastvale, CA
Rv Sofa Beds Eastvale, CA
Rv Chairs Eastvale, CA
Rv Chairs Eastvale, CA
Replacement Windows For Campers Eastvale, CA
Rv Dinette Booth Eastvale, CA
Rv Dinette Table Eastvale, CA
Rv Sofas Eastvale, CA
Rv Replacement Awnings Eastvale, CA
Rv Restoration Companies Eastvale, CA
Awning Installation Eastvale, CA
Replacement Windows For Rv Eastvale, CA
Rv Interior Furniture Eastvale, CA
Rv Floor Replacement Eastvale, CA
Rv Upholstery Eastvale, CA
Rv Sofa Sleeper Eastvale, CA
Awnings For Trailers Eastvale, CA
Awning Installation Eastvale, CA
Rv Dinette Table Eastvale, CA
Awnings For Trailers Eastvale, CA
Rv Dining Table Eastvale, CA
Replacement Rv Windows Eastvale, CA
Rv Restoration Companies Eastvale, CA
Replacement Rv Windows Eastvale, CA
Rv Refrigerator Replacement Eastvale, CA
Motorhome Carpets Eastvale, CA
Rv Interior Furniture Eastvale, CA
Rv Carpet Installation Eastvale, CA
Rv Couch Eastvale, CA
Rv Interior Remodel Eastvale, CA
Rv Dinette Booth Eastvale, CA
Rv Dinette Table Eastvale, CA
Replacement Windows For Campers Eastvale, CA
Rv Dinette Table Eastvale, CA
Replacement Rv Refrigerator Eastvale, CA
Rv Refrigerator Replacement Eastvale, CA
Rv Replacement Awnings Eastvale, CA
Replacement Windows For Campers Eastvale, CA
Replacement Rv Refrigerator Eastvale, CA
Rv Interior Furniture Eastvale, CA
Near Here Seo Management Eastvale, CA
Near You Seo Company Eastvale, CA
OCRV Center
Table of Contents
- – Remodeling Rv Eastvale, CA
- – OCRV Center
- – Rv Restoration Companies Eastvale, CA
- – Awnings For Rv Eastvale, CA
- – Rv Chairs Eastvale, CA
- – Rv Floor Replacement Eastvale, CA
- – Rv Couch Bed Eastvale, CA
- – Rv Chairs Eastvale, CA
- – Replacement Windows For Rv Eastvale, CA
- – Rv Sofa Beds Eastvale, CA
- – Replacement Windows For Rv Eastvale, CA
- – Rv Microwave Replacement Eastvale, CA
- – OCRV Center
Latest Posts
Seniors Insurance San Clemente
Delta Dental Insurance For Seniors Laguna Hills
Single Health Insurance Plans Rancho Santa Margarita
More
Latest Posts
Seniors Insurance San Clemente
Delta Dental Insurance For Seniors Laguna Hills
Single Health Insurance Plans Rancho Santa Margarita