All Categories
Featured
Table of Contents
- – Motorhome Painting Near Me Eastvale, CA
- – OCRV Center
- – Rv Paint And Body Shops Near Me Eastvale, CA
- – Rv Painting Near Me Eastvale, CA
- – Motorhome Custom Paint Jobs Eastvale, CA
- – Rv Painting Near Me Eastvale, CA
- – Paint Motorhome Exterior Eastvale, CA
- – Motorhome Custom Paint Eastvale, CA
- – Rv Painting Eastvale, CA
- – Custom Motorhome Paint Jobs Eastvale, CA
- – Motorhome Painting Eastvale, CA
- – Class A Rv Custom Paint And Repair Eastvale, CA
- – Paint Motorhome Exterior Eastvale, CA
- – Rv Paint Job Eastvale, CA
- – OCRV Center
Motorhome Painting Near Me Eastvale, CA
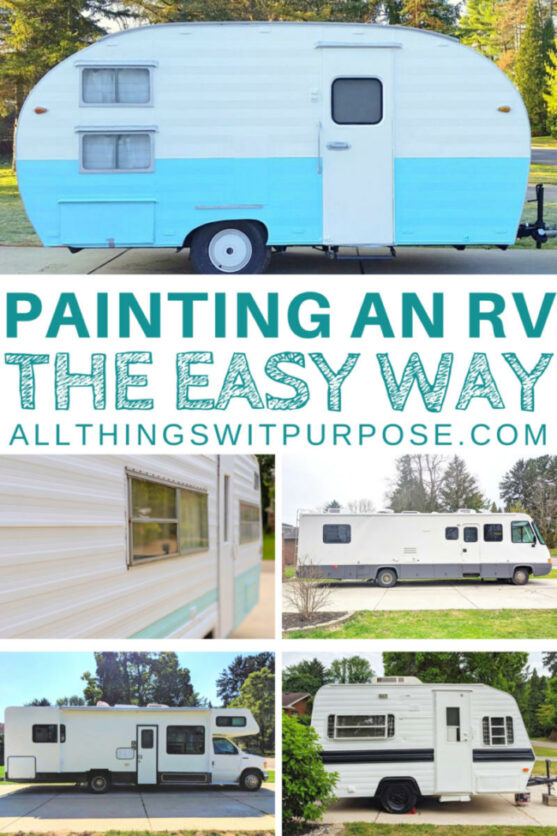
A specialist looking paint task calls for great tools, so this is not an area you intend to skimp. I considered leasing or purchasing a paint sprayer, but ultimately decided to stick to paint rollers and brushes because I'm more comfortable painting this way. It was a good choice due to the fact that the finish came out just fine the means we did it.
Below are the materials we utilized: Right here are the actions you'll require to take to finish your recreational vehicle outside paint task. Do not stint prep, it's one of the most fundamental part. I won't lie to you, this is by far the worst component. It took us possibly 40 hours of home heating decals that weren't cracked with a hair dryer and peeling them off.
Rv Paint And Body Shops Near Me Eastvale, CA
(we did our stove exhaust air vent.?.!!) - Eastvale Painting Fiberglass Motorhome. Re-caulk any type of joints that require it. Obtain your surface area as also as possible. Simply the lightest of scuffs, do not take layers off. Vacuum and get rid of the dirt very carefully. Tape off any kind of components or cut with painters tape. We really did not need to prime individually since the paint we selected was 2-in-1.
Go sluggish and return to it the next day if you need to. Simply don't relocate the projector till you're done! This is one of the most enjoyable part. Okay, so just how is it holding up? This was my biggest concern with this project, so I intend to share the real world pictures! One year later on, and I'm extremely pleased with exactly how the paint is standing up.
You can see the little chips on the door (it's likewise really unclean from Alaska mud, yet that's cleanable!): I actually hurt myself trying to choose whether to repaint our motor home outside, and I am SO glad that we did. I like it, and we obtain a lot of compliments. The method we did it could stress the recreational vehicle exterior paint purists, but I would certainly 100% do this once more.
Associate revenue assists fund our family travel and allows me to maintain developing motivating family traveling web content for you. I so appreciate when you use my web links to make acquisitions you would have made anyway. For more RV restoration, here are a few other messages you could such as:.
Rv Painting Near Me Eastvale, CA
It's become fairly popular just recently for people to restore their Motor homes. Among the most common things individuals intend to discover to do is how to paint recreational vehicle closets and wall surfaces. This is a wonderful means to freshen any room immediately and relatively conveniently. Today, I wish to show you a step-by-step overview on exactly how to repaint your recreational vehicle cabinets! The most recent project in our 5th wheel was repainting our cooking area island, which I will likely be describing most commonly in this post.
These steps are all needed whether you have actual timber or fake wood cabinets in your Recreational vehicle (Eastvale Painting Fiberglass Motorhome). The initial thing you require to do is get a drill and eliminate whatever from the cabinet base.
We picked to make use of spray paint and paint ours black. All of the adhering to steps will certainly require to be done on any type of drawer fronts and closet doors. I such as to take them outdoors and repaint them there to aid with fumes as well as spread out my office.
Motorhome Custom Paint Jobs Eastvale, CA
Make certain to allow them properly dry according to the directions on the filler you're using. We examined out avoiding fining sand on some of the cabinets during our bathroom remodelling and found that the paint does not stick.
We (and by we, I mean Tucker haha) sanded the island actually well and have had absolutely no concerns with paint peeling also though it's been over a year considering that then. Depend on me, don't skip fining sand.
Personally, I used a microfiber towel with just water and it obtained every little thing up. You do not desire any kind of dust or sawdust being left behind as it can obtain right into your paint work and mess up the texture/finish.
I've discovered that doing this system can make a significant difference!, but you can use whatever you choose. Extremely thoroughly position the tape around any type of surface areas that require to be shielded.
Rv Painting Near Me Eastvale, CA
Pro idea: Puppy pads in fact make a wonderful mobile drip cloth. When I repainted our motor home island, I made use of a pup pad to establish my paint can on and ran it around the island as I painted. It captured numerous drips and was super simple to cleanse up and throw out when I was done! Now that your preparation job is complete, you prepare to prime your RV closets.
One of the most typical inquiries I am asked is what guide I like to make use of. It works really well, and it additionally dries quickly. I suggest utilizing an oil-based guide rather of a water-based one.
Make certain that you are in a well-ventilated location when utilizing it. It normally makes my eyes water/burn, so use protective glasses if required.
Paint Motorhome Exterior Eastvale, CA
It's typically dry to the touch in about 30 minutes and I'm able to paint shortly after that. You've prepped and primed, and you're all set to paint! I like making use of a paintbrush for primer and paint, yet you can likewise make use of foam rollers if you're much more comfortable with that.
I constantly do 2-3 coats of paint, depending on the color. Darker paint colors often tend to require a third layer. You can constantly discuss it and retouch a few spots without applying a whole third layer of paint also, if required. I advise you paint over all surfaces a minimum of 2 times.
I know several RVers have used chalk paint on their camper cupboards, but I don't have any type of individual experience keeping that. There are a great deal of possible paint kinds you can make use of, and a great deal to discover about paint types. I such as to utilize EasyCare Ultra Costs Satin Interior paint from the local equipment shop.
Do your research and determine what paint is going to be best for you and your needs. Don't fail to remember to also do these very same steps for your cupboard doors and pull-out drawer fronts. Yay! Currently you know just how to paint recreational vehicle closets, and all that's left is a few ending up actions.
Motorhome Custom Paint Eastvale, CA
The only major distinction when painting recreational vehicle wall surfaces is that you do not intend to sand them. You will still require to clean them extremely thoroughly, yet miss the sanding and go directly to the primer. If you sand your RV walls, they will certainly shed their texture, and the paint will certainly have a more challenging time adhering to the walls.
Whatever paint you pick to utilize, simply see to it you prep and prime it in breakthrough. Other popular options are oil-based paint and chalk paint. The ideal method to obtain paint to stay with RV cupboards is by making use of 220 grit sandpaper to rough up the surface before you paint.
Paint recreational vehicle closets is effort, however the end outcome is SO worth it! Repainting your motor home cupboards can enable you to make your recreational vehicle much more cozy and individualized to your design and preferences. It's fantastic what a new coat of paint can do. Yes, you can paint recreational vehicle cupboards without sanding.
Skipping the sanding action of paint RV cupboards can result in the paint not adhering well and peeling off. It takes 4-8 hours to paint RV closets, depending on just how many you are doing.
Rv Painting Eastvale, CA
I wish that this blog post about how to paint camper cabinets has actually been valuable which painting the cabinets in your recreational vehicle is not a daunting idea any longer. RV remodellings can take a very long time, however the end outcome is absolutely worth it! I actually enjoy how our cabinets have ended up thus far, and I'm thrilled to end up our tasks! Exactly How to Repaint motor home Cupboards 1 day Remove any kind of equipment, cabinets, and doors from your RV cupboards.
I have actually constantly wanted to update my recreational vehicle, however doing so might have hurt the resale value. I determined to restrict the modifications to ensure that my individual RV preference wouldn't affect the resale worth. If that's trivial to you then of course relocate ahead on your task. Simply in instance you believe you could sell your Recreational vehicle one day, it's an excellent idea to consider this.
A great idea is to check-out other individuals's Recreational vehicles to obtain ideas. A blog site I like to adhere to for DIY concepts and remodellings is recreational vehicle Motivation (see web link at the end of this article). I'm buddies with Ashley, the initial blog site proprietor and I know Health and Alyssa Padgett who took it over in 2022.
Custom Motorhome Paint Jobs Eastvale, CA
Next off, pick your budget plan. If you read this post after that you're most likely attempting to do points on a spending plan. However DIY jobs frequently have prices that you don't prepare for since something failed or you you missed out on a step. To begin with a budget plan you'll require to recognize what supplies you require and which ones you currently have.
There are a variety of RV paints to choose from. RV paint is available in three distinctive ranges. Water-based paints are one of the most usual kind of motor home paint. They are easy to use and tidy up. Water-based paints additionally have a reduced odor, which is vital when paint in restricted rooms.
Enamel paints are the most resilient type of Motor home paint. Currently that you understand a little more about the kinds of Motor home paint readily available, you can begin to tighten down your color options.
Motorhome Painting Eastvale, CA

Consider the overall appearance you're trying to accomplish. Do you desire something intense and cheery? Or are you choosing an extra subdued appearance? As soon as you have a concept of the overall feel you're going for, you can begin to limit your color selections. My friends, Dan and Lisa Brown, from Constantly on Freedom, repainted their motor home interior with brilliant colors.
See the web link listed below to discover more about their task. Another point to keep in mind is the amount of all-natural light that will remain in the area. If there isn't a great deal of all-natural light, you may intend to opt for lighter colors so the space doesn't really feel also dark.
Class A Rv Custom Paint And Repair Eastvale, CA
I have constantly intended to upgrade my motor home, however doing so may have injured the resale worth. I chose to restrict the modifications to ensure that my individual recreational vehicle taste wouldn't impact the resale worth. If that's trivial to you then of course progress on your project. Just in case you assume you could offer your Motor home one day, it's an excellent idea to consider this.
A good idea is to check-out other individuals's Motor homes to obtain ideas. A blog site I love to comply with for do it yourself ideas and renovations is motor home Ideas (see web link at the end of this article). I'm pals with Ashley, the original blog site owner and I understand Wellness and Alyssa Padgett who took it over in 2022.
Next, select your budget. If you read this blog post then you're likely trying to do things on a budget. But do it yourself tasks commonly have costs that you do not intend for since something failed or you you missed a step. To begin with a spending plan you'll require to know what products you need and which ones you currently have.
There are a selection of RV paints to choose from. RV paint can be found in 3 distinctive ranges. Water-based paints are the most usual kind of RV paint. They are very easy to use and cleanse up. Water-based paints also have a low smell, which is essential when painting in confined areas.
Paint Motorhome Exterior Eastvale, CA
They are additionally extra immune to fading and chalking. Enamel paints are the most resilient sort of RV paint. They provide a high-gloss finish that can last for several years. Enamel paints are much more challenging to apply, however, and require particular application techniques. Since you know a bit a lot more concerning the kinds of recreational vehicle paint offered, you can start to narrow down your color options.
Think about the total appearance you're attempting to accomplish. Do you desire something brilliant and happy? Or are you going for a much more restrained look? As soon as you have an idea of the overall feel you're opting for, you can begin to limit your color choices. My good friends, Dan and Lisa Brown, from Constantly on Liberty, painted their recreational vehicle interior with brilliant colors.
Rv Paint Job Eastvale, CA
OCRV Center
Address: 23281 La Palma Ave Yorba Linda, CA 92887Phone: (714) 909-1444
Email: [email protected]
OCRV Center
See the web link listed below to find out more about their task. One more point to keep in mind is the amount of all-natural light that will remain in the room. If there isn't a whole lot of all-natural light, you may want to choose lighter colors so the area does not feel as well dark.
Custom Painted Motorhomes Eastvale, CAPaint Rv Eastvale, CA
Rv Paint Job Eastvale, CA
Rv Painter Eastvale, CA
Paint Fiberglass Rv Eastvale, CA
Painting An Rv Eastvale, CA
Motorhome Paint Shops Eastvale, CA
Rv Paint And Body Shops Near Me Eastvale, CA
Rv Exterior Paint Eastvale, CA
Rv Painting Eastvale, CA
Painting Rv Eastvale, CA
Rv Paint And Body Shops Near Me Eastvale, CA
Paint Rv Eastvale, CA
Rv Painter Eastvale, CA
Rv Paint And Repair Eastvale, CA
Motorhome Paint Repair Eastvale, CA
Rv Paint Repair Eastvale, CA
Custom Painted Motorhomes Eastvale, CA
Motorhome Custom Paint Jobs Eastvale, CA
Painting Fiberglass Motorhome Eastvale, CA
Painting Rv Exterior Eastvale, CA
Rv Paint Job Eastvale, CA
Custom Painted Motorhomes Eastvale, CA
Rv Paint Repair Eastvale, CA
Class A Rv Custom Paint And Repair Eastvale, CA
Rv Paint Shop Near Me Eastvale, CA
Rv Paint Job Eastvale, CA
Custom Rv Paint Eastvale, CA
Paint Rv Eastvale, CA
Painting Fiberglass Motorhome Eastvale, CA
Motorhome Custom Paint Jobs Eastvale, CA
Rv Painter Eastvale, CA
Rv Paint Shop Near Me Eastvale, CA
Painting Fiberglass Motorhome Eastvale, CA
Rv Paint Shops Near Me Eastvale, CA
Paint Motorhome Exterior Eastvale, CA
Paint Fiberglass Rv Eastvale, CA
Painting An Rv Eastvale, CA
Custom Rv Paint Jobs Eastvale, CA
Rv Paint Repair Eastvale, CA
Paint Fiberglass Rv Eastvale, CA
Paint Fiberglass Rv Eastvale, CA
Class A Rv Custom Paint And Repair Eastvale, CA
Painting Rv Walls Eastvale, CA
Rv Paint Shop Near Me Eastvale, CA
Rv Paint Job Eastvale, CA
Painting An Rv Eastvale, CA
Painting Fiberglass Motorhome Eastvale, CA
Rv Painting Eastvale, CA
Rv Paint And Body Shops Near Me Eastvale, CA
Rv Painter Eastvale, CA
Rv Paint And Body Shops Near Me Eastvale, CA
Paint Rv Eastvale, CA
Rv Paint Eastvale, CA
Paint Motorhome Exterior Eastvale, CA
Motorhome Paint Repair Eastvale, CA
Rv Painter Eastvale, CA
Motorhome Custom Paint Jobs Eastvale, CA
Motorhome Paint Repair Eastvale, CA
Rv Painting Eastvale, CA
Rv Paint Shops Near Me Eastvale, CA
Custom Rv Paint Jobs Eastvale, CA
Paint Fiberglass Rv Eastvale, CA
Paint Fiberglass Rv Eastvale, CA
Rv Painting Near Me Eastvale, CA
Custom Motorhome Paint Jobs Eastvale, CA
Paint Fiberglass Rv Eastvale, CA
Motorhome Custom Paint Jobs Eastvale, CA
Custom Rv Paint Eastvale, CA
Paint Motorhome Exterior Eastvale, CA
Rv Paint Repair Eastvale, CA
Rv Painting Eastvale, CA
Rv Painter Eastvale, CA
Custom Painted Motorhomes Eastvale, CA
Paint Rv Eastvale, CA
Rv Paint Shops Near Me Eastvale, CA
Motorhome Custom Paint Eastvale, CA
Painting Rv Walls Eastvale, CA
Finding A Good Seo Companies Near Me Eastvale, CA
Around Me Seo Near Me Eastvale, CA
Painting Fiberglass Motorhome Eastvale, CA
OCRV Center
Table of Contents
- – Motorhome Painting Near Me Eastvale, CA
- – OCRV Center
- – Rv Paint And Body Shops Near Me Eastvale, CA
- – Rv Painting Near Me Eastvale, CA
- – Motorhome Custom Paint Jobs Eastvale, CA
- – Rv Painting Near Me Eastvale, CA
- – Paint Motorhome Exterior Eastvale, CA
- – Motorhome Custom Paint Eastvale, CA
- – Rv Painting Eastvale, CA
- – Custom Motorhome Paint Jobs Eastvale, CA
- – Motorhome Painting Eastvale, CA
- – Class A Rv Custom Paint And Repair Eastvale, CA
- – Paint Motorhome Exterior Eastvale, CA
- – Rv Paint Job Eastvale, CA
- – OCRV Center
Latest Posts
Walnut Camper Trailer Service
Motorhome Service And Repair Near Me Guasti
Motorhome Repair Service Diamond Bar
More
Latest Posts
Walnut Camper Trailer Service
Motorhome Service And Repair Near Me Guasti
Motorhome Repair Service Diamond Bar