All Categories
Featured
Table of Contents
- – Rv Trailer Roof Repair Corona, CA
- – OCRV Center
- – Rv Trailer Roof Repair Corona, CA
- – Rv Trailer Rubber Roof Repair Corona, CA
- – Rv Roof Maintenance Corona, CA
- – Rubber Roof For Rv Corona, CA
- – Rv Rubber Roof Repair Corona, CA
- – Rv Roof Repair Near Me Corona, CA
- – Rv Roof Maintenance Corona, CA
- – Repair Rv Roof Corona, CA
- – OCRV Center
Rv Trailer Roof Repair Corona, CA
In this post, we wish to show you exactly how to do it yourself RV roofing fixing. Living in a RV has fantastic moments, yet points also fail. Recognizing exactly how to DIY a great deal of the important things that can break or mess up will certainly save you not just a lot of money on recreational vehicle repairs but could additionally save you a great deal of potential time in the store! This blog post might include associate web links.
I might get a small compensation when you make a purchase using my link. This is how we finished up with a couple of little tears on the roofing of our Recreational vehicle.
Rv Trailer Roof Repair Corona, CA
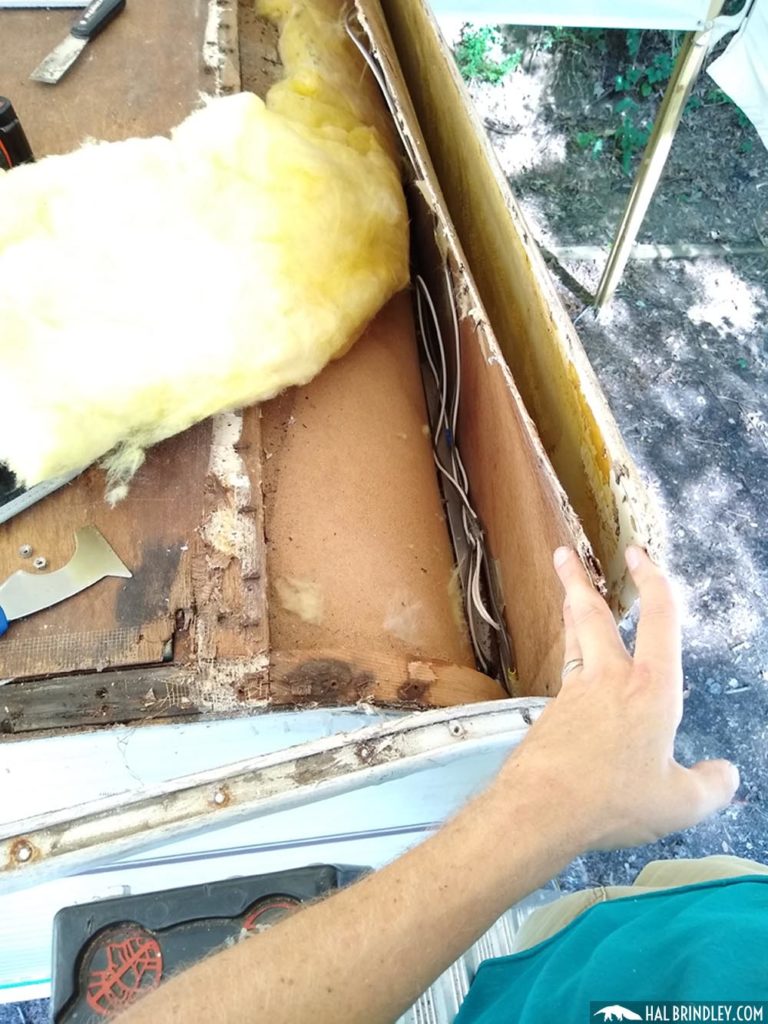
We thought we were free from the branches, yet we wound up capturing a few of them on the far left side of the roofing. There were a total of 4-5 small openings in the side of the roofing. Originally, we didn't examine the roofing due to the fact that we didn't believe we strike anything.
During the tornado, we located that we had a percentage of water dripping via among the lights in the washroom. Thankfully we did not end up with any kind of irreversible water damages. After the tornado, Tucker increased on the roofing and that is when he discovered the openings.
Rv Trailer Rubber Roof Repair Corona, CA
You'll desire to clean the location around the tear that you will be patching well. To cleanse the roofing, make use of massaging alcohol and either a rag or paper towels.
, which is a Recreational vehicle roofing repair work tape. Eternabond makes the best Motor home roof covering tapes and is an excellent product to have on hand for the emergency situation repair service of a dripping roofing.
Rv Roof Maintenance Corona, CA
Get rid of the support and use very carefully over the tear in the roofing. Once it has actually touched the roof it sticks rather swiftly so you'll want to make certain and placement it right the first time.
This rubber sealer develops a safe and secure second seal on your rubber roof and ensures that the leakage is correctly sealed. This is most likely the very same sealant that was made use of on your motor home roof to seal around the roofing vents, air conditioners, and so on. There are a great deal of Dicor RV roof covering repair work products that you can get including roofing system finishings, roofing system sealer, and much more for the surface area of your roof covering.
If the damage gets on the side of your camper roofing system like ours was, you might have some Dicor that runs down the side. Wipe any kind of excess off and don't enable it to run down as well much. This is a self-leveling sealant so you need to wind up with a relatively level spot.
Rubber Roof For Rv Corona, CA
So with time, it will totally harden and you won't have to stress over it any longer. Rv Slide Out Roof Repair Corona. After the Dicor lap sealer was applied If the leakage in your RV roofing is a tiny area, the ideal means to repair it is to follow our detailed guide and repair the damaged area yourself to take care of the small leak
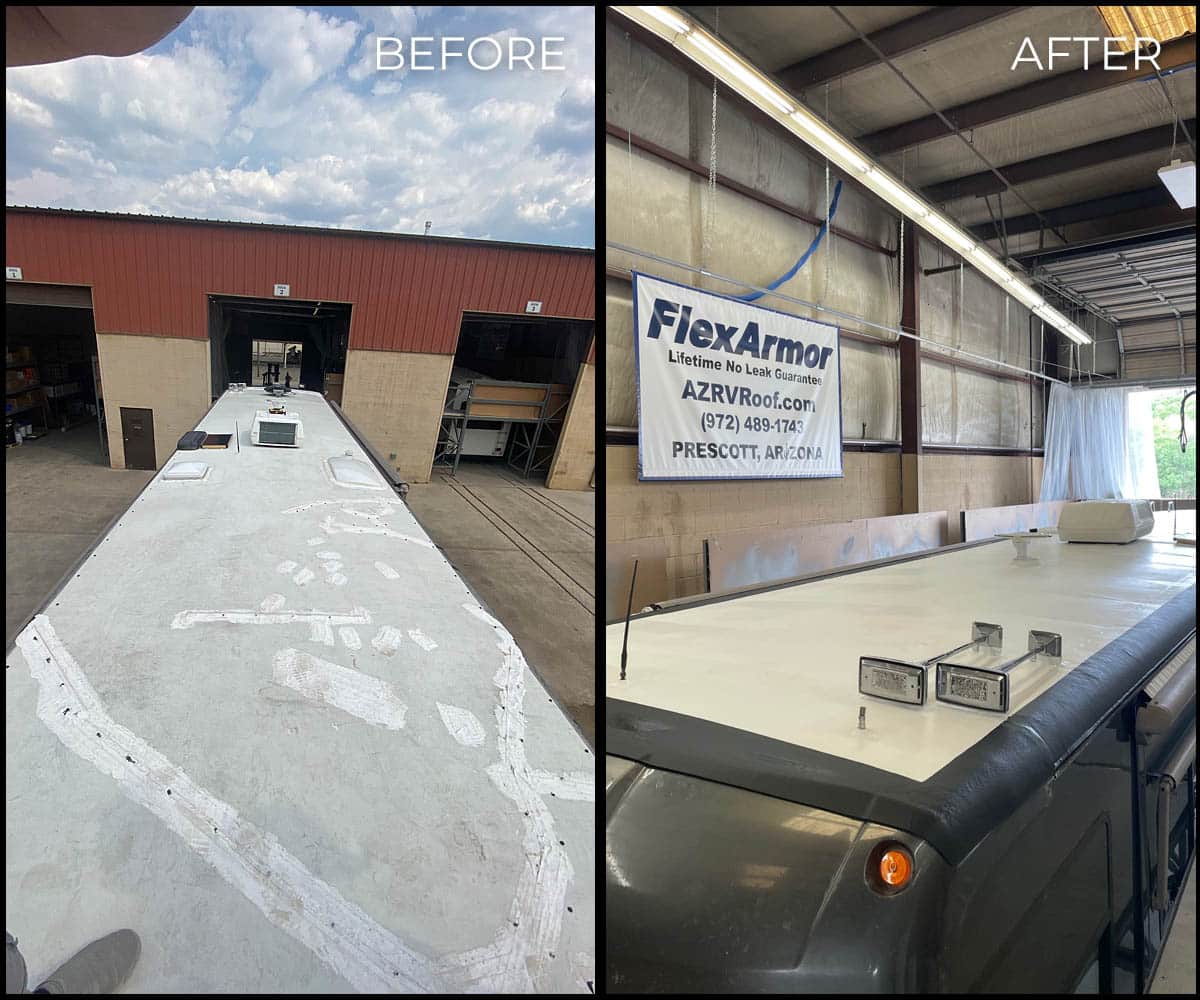
A straightforward RV roof fixing, as we did on our repair work work, is reasonably affordable and should set you back less than $50 for DIY RV owners. To replace an entire motor home roofing system with substantial damage would certainly cause a lot more costly repair work. I hope that you have found the information in this post practical.
Rv Rubber Roof Repair Corona, CA
This will certainly give you comfort and validate that your roofing system remains in wonderful form. Exactly how to DIY Your RV Roof Fixing.
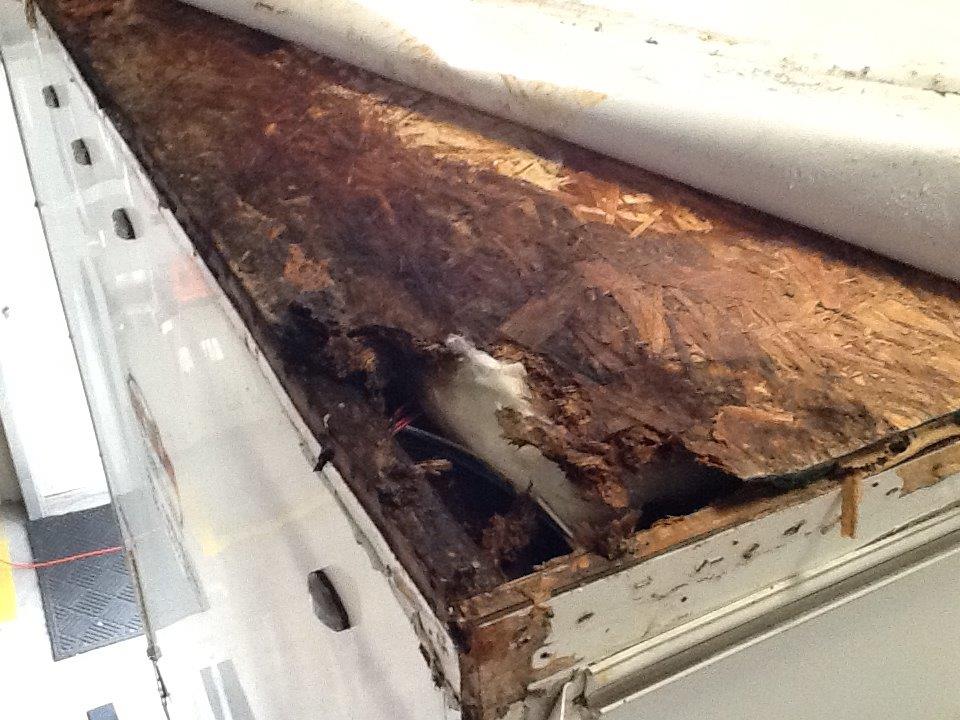
If you do not check, reseal, and repair your motor home roofing on a regular basis, you will certainly finish up with some appealing horrible water damage. This is something that will quickly decrease the value of your RV and might also provide it unusable. Taking treatment of your RV roofing system is something you can probably do all on your own.
After regarding 10 years, it will likewise be essential to reseal the entire roofing system. To do this, you'll need to climb up onto the roofing system, yet be very mindful when you do.
Next off, you'll desire to clean your roof covering thoroughly, so regarding eliminate any dust particles. You can make use of a lengthy handled brush for this, yet never ever make use of a cleaner which contains petroleum solvents or citrus components on your rubber or plastic roofing. These kinds of cleansers will certainly trigger irreversible damage to the surface.
Rv Roof Repair Near Me Corona, CA
While you're cleaning, scrape off any type of debris or old roof material, yet beware while you do this as you can easily extend a tear, and even punch a hole with the roofing. You ought to after that dry the roof covering as best as you can. Note: Rubber recreational vehicle roof coverings can be very unsafe when damp.
After the roofing is clean, you are going to intend to inspect the seams for openings, fractures or peeling off, so you can reseal wherever necessary. In addition to that, you'll want to resolve resealing all seams when a year whether they show signs of wear.
Rv Roof Maintenance Corona, CA
When it comes to selecting the best RV roof covering sealer, you'll want to consider whether you are repairing a tear, resealing a seam, or sealing the entire roofing system. It can be used for area sealing or to reseal every seam on the RV roof covering. Just clean up the location well and use with a caulk gun.
Repair Rv Roof Corona, CA
Comparable to the EPDM system listed above, this covering item will certainly cover your TPO roof and help it last another 10 years. Before EPDM and TPO, steel was the material of option for RV roofing systems.
The previously mentioned EternaBond is still king when it comes to repairing small damages on a steel roof covering. RV metal roofings do need to be absolutely resealed from time to time.
Rv Rubber Roof Replacement Corona, CARv Trailer Rubber Roof Repair Corona, CA
Class C Rv Roof Repair Corona, CA
Rv Roof Leak Repair Corona, CA
Resealing Rv Roof Corona, CA
Roof Repair For Rv Corona, CA
Rubber Roofing For Rv Corona, CA
Rubber Roofing For Campers Corona, CA
Roof Repair For Rv Corona, CA
Rv Roof Replacement Corona, CA
Rv Rubber Roof Replacement Cost Corona, CA
Repair Rv Roof Corona, CA
Rubber Roof Installation Corona, CA
Rv Trailer Rubber Roof Repair Corona, CA
Rubber Roofing For Rv Corona, CA
Epdm Rv Roof Repair Corona, CA
Rv Roof Repair Corona, CA
Rv Fiberglass Roof Repair Corona, CA
Rubber Roof For Camper Corona, CA
Rv Roof Leak Repair Corona, CA
Rv Fiberglass Roof Repair Corona, CA
Motorhome Roof Replacement Corona, CA
Rv Roof Repair Corona, CA
Rv Roof Leak Repair Corona, CA
Rubber Roofing For Campers Corona, CA
Rubber Roof For Rv Corona, CA
Best Rv Roof Repair Corona, CA
Rv Trailer Rubber Roof Repair Corona, CA
Epdm Rv Roof Repair Corona, CA
Rv Roof Repair Corona, CA
Rv Trailer Rubber Roof Repair Corona, CA
Class C Rv Roof Repair Corona, CA
Rv Rubber Roof Repair Corona, CA
Rv Rubber Roof Replacement Corona, CA
Rv Rubber Roof Replacement Cost Corona, CA
Rv Roof Repair Corona, CA
Roof Repair For Rv Corona, CA
Replace Rv Roof Corona, CA
Rv Fiberglass Roof Repair Corona, CA
Rv Rubber Roof Replacement Cost Corona, CA
Rv Roof Maintenance Corona, CA
Rubber Roof For Rv Corona, CA
Rubber Roofing For Campers Corona, CA
Rv Rubber Roof Replacement Corona, CA
Rv Roof Replacement Corona, CA
Rubber Roofing For Campers Corona, CA
Epdm Rv Roof Repair Corona, CA
Epdm Rv Roof Repair Corona, CA
Rv Roof Repair Near Me Corona, CA
Rv Fiberglass Roof Repair Corona, CA
Class C Rv Roof Repair Corona, CA
Rv Roof Repair Service Near Me Corona, CA
Rv Trailer Roof Repair Corona, CA
Rv Fiberglass Roof Repair Corona, CA
Repair Rv Roof Leak Corona, CA
Rv Rubber Roof Maintenance Corona, CA
Rv Slide Out Roof Repair Corona, CA
Rv Roof Maintenance Corona, CA
Rv Roof Repair Service Near Me Corona, CA
Class C Rv Roof Repair Corona, CA
Rv Slide Out Roof Repair Corona, CA
Rv Rubber Roof Maintenance Corona, CA
Rv Roof Repair Fiberglass Corona, CA
Rv Rubber Roof Repair Corona, CA
Rv Roof Leak Repair Corona, CA
Rv Roof Leak Repair Corona, CA
Rv Roof Replacement Corona, CA
Rv Roof Leak Repair Corona, CA
Rv Roof Repair Service Near Me Corona, CA
Rv Roof Repair Service Near Me Corona, CA
Rv Rubber Roof Repair Corona, CA
Repair Rv Roof Corona, CA
Rv Rubber Roof Repair Corona, CA
Resealing Rv Roof Corona, CA
Class C Rv Roof Repair Corona, CA
Rv Rubber Roof Replacement Corona, CA
Best Rv Roof Repair Corona, CA
Rv Roof Leak Repair Near Me Corona, CA
Around Here Seo Company Corona, CA
Around Here Seo Marketing Company Corona, CA
OCRV Center
Table of Contents
- – Rv Trailer Roof Repair Corona, CA
- – OCRV Center
- – Rv Trailer Roof Repair Corona, CA
- – Rv Trailer Rubber Roof Repair Corona, CA
- – Rv Roof Maintenance Corona, CA
- – Rubber Roof For Rv Corona, CA
- – Rv Rubber Roof Repair Corona, CA
- – Rv Roof Repair Near Me Corona, CA
- – Rv Roof Maintenance Corona, CA
- – Repair Rv Roof Corona, CA
- – OCRV Center
Latest Posts
Truck Repair Shops Near Me Villa Park
Sprinter Van Repair Near Me West Covina
Rv Collision Repair Near Me Pomona
More
Latest Posts
Truck Repair Shops Near Me Villa Park
Sprinter Van Repair Near Me West Covina
Rv Collision Repair Near Me Pomona